Security · low risk
Add Cloudflare Access in Front of a Tunnel Service
Protect a homelab service behind Cloudflare Tunnel with Cloudflare Access policies, identity login, safer Docker Compose networking, verification checks, and rollback steps.
Add Cloudflare Access in Front of a Tunnel Service
Estimated reading time: 12 minutes
Overview
Cloudflare Tunnel is a clean way to publish a homelab service without opening inbound firewall ports. The missing piece is authentication. If the hostname is reachable and no other control exists, anyone who discovers the URL can hit the application login page.
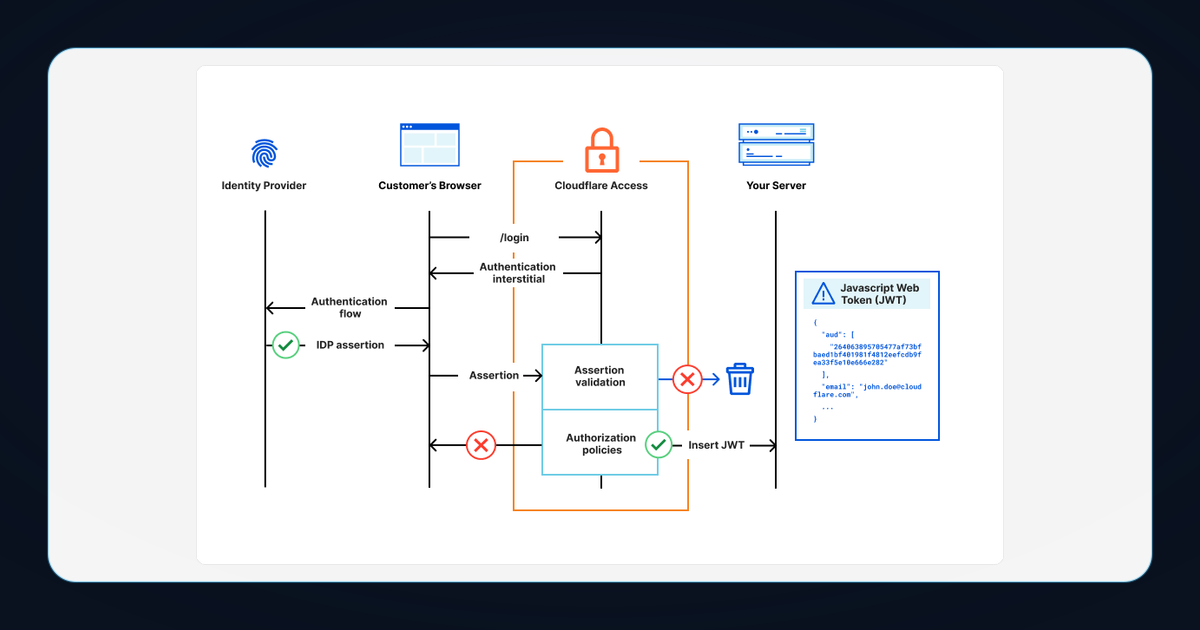
Cloudflare Access fixes that by adding an identity gate at Cloudflare’s edge. A visitor must pass an Access policy before Cloudflare forwards the request into the tunnel. That policy can require email one-time PIN, Google Workspace, GitHub, Microsoft Entra ID, Okta, SAML, OIDC, mTLS, country rules, IP rules, or service tokens.
This guide builds on the existing Cloudflare Tunnel pattern and adds Access in front of one self-hosted hostname.
Official references:
- Cloudflare Access overview
- Cloudflare Access applications
- Cloudflare Access policies
- Cloudflare Tunnel configuration file
- Cloudflare Access service tokens
- Cloudflare Access JWT validation
Why I Built/Tested This
A basic tunnel is good for reducing exposed ports, but it is not the same thing as an authorization policy. For GNTECH-style homelab services, I usually want three layers:
- No inbound public port on the server.
- Cloudflare Access login before the request reaches the origin.
- Application-level authentication after Access, especially for admin tools.
Practical examples:
- Open WebUI for local LLM access.
- Grafana dashboards for monitoring.
- Uptime Kuma private status pages.
- Small internal tools that are useful from outside the LAN.
I would not use this pattern as the only protection for high-risk admin panels such as Proxmox, Portainer, router interfaces, password vaults, or storage consoles. For those, keep VPN access or add stronger controls such as mTLS, short sessions, separate admin accounts, and app-level authentication.
Hardware/Software Used
| Component | Example value |
|---|---|
| Domain | example.com managed in Cloudflare DNS |
| Public hostname | app.example.com |
| Origin service | App listening on container port 8080 |
| Server OS | Debian or Ubuntu Linux |
| Container runtime | Docker Engine with Compose plugin |
| Tunnel client | cloudflare/cloudflared:latest container |
| Identity method | Cloudflare email one-time PIN or your existing IdP |
| Cloudflare product | Cloudflare Zero Trust Access |
Placeholders used below:
| Placeholder | Replace with |
|---|---|
app.example.com | Your real hostname |
<tunnel-id> | Your Cloudflare Tunnel UUID |
<account-id> | Your Cloudflare account ID |
<access-app-id> | The Access application ID if using API rollback |
you@example.com | Your approved email or domain |
Architecture
Without Access:
User browser
  -> Cloudflare edge
  -> Cloudflare Tunnel
  -> local service
With Access:
User browser
  -> Cloudflare edge
  -> Access policy check
     -> no valid session: redirect to login
     -> valid session: forward request
  -> Cloudflare Tunnel
  -> local service
The important change is where the request is stopped. An unauthenticated browser should never reach the tunnel connector or the local service through the public hostname.
Access normally sets a CF_Authorization cookie after successful browser login. For non-browser clients, use Access service tokens instead of trying to automate interactive login.
Installation
This article assumes the tunnel already exists and the hostname already routes to your service. Verify the base tunnel first:
curl -I https://app.example.comUseful signs:
- The response includes Cloudflare headers such as
server: cloudflareandcf-ray. - The hostname resolves through Cloudflare.
- The application works before Access is enabled.
If the tunnel itself is broken, fix that before adding Access. Access adds an auth layer; it does not repair tunnel routing, DNS, or origin service failures.
Open the Zero Trust dashboard:
https://one.dash.cloudflare.com/Then go to:
Access -> Applications -> Add an application -> Self-hostedFull Configuration
1. Keep the tunnel config explicit
Example cloudflared/config.yml:
tunnel: <tunnel-id>
credentials-file: /etc/cloudflared/<tunnel-id>.json

ingress:
  - hostname: app.example.com
    service: http://app:8080
  - service: http_status:404
The final http_status:404 rule matters. It prevents unexpected hostnames from falling through to the wrong internal service.
Example compose.yml:
services:
  cloudflared:
    image: cloudflare/cloudflared:latest
    container_name: cloudflared-app
    restart: unless-stopped
    command: tunnel --config /etc/cloudflared/config.yml run
    volumes:
      - ./cloudflared:/etc/cloudflared:ro
    networks:
      - tunnel-net

  app:
    image: nginx:alpine
    container_name: access-demo-app
    restart: unless-stopped
    expose:
      - "8080"
    networks:
      - tunnel-net

networks:
  tunnel-net:
    driver: bridge
This example intentionally uses expose, not ports. The app is reachable by cloudflared on the Docker network, but it is not published on the host interface.
If your real application cannot listen on port 8080, change both places:
- The application container port.
- The
service: http://app:<port>target inconfig.yml.
2. Create the Access application
In Cloudflare Zero Trust:
Access -> Applications -> Add an application -> Self-hostedSuggested application settings:
| Field | Value |
|---|---|
| Application name | Homelab App |
| Application domain | app.example.com |
| Session duration | 8h or 24h depending on sensitivity |
| Identity providers | Email OTP or your configured IdP |
For a first setup, Email OTP is the least complicated identity method. It avoids OIDC/SAML setup and is enough to prove the Access policy works. For a team environment, use Google Workspace, Microsoft Entra ID, GitHub, Okta, or another managed IdP.
3. Add an allow policy
Create a policy with action Allow.
Simple single-user policy:
| Policy field | Example |
|---|---|
| Policy name | Allow Gerlin |
| Action | Allow |
| Include rule | Emails -> you@example.com |
Small-team policy:
| Policy field | Example |
|---|---|
| Policy name | Allow GNTECH Team |
| Action | Allow |
| Include rule | Emails ending in -> @example.com |
| Require rule | Optional country, mTLS, or IdP requirement |
Be careful with broad rules. Emails ending in @example.com is convenient, but every account in that domain can reach the app unless another Require rule narrows it.
4. Add a service token for automation, if needed
Interactive Access login is for humans. Monitoring tools, scripts, and API clients should use service tokens.
Create one in:
Access -> Service Auth -> Service Tokens -> Create Service TokenThen add a policy for the same Access application:
| Policy field | Example |
|---|---|
| Policy name | Allow Monitoring Service Token |
| Action | Service Auth |
| Include rule | Service Token -> selected token |
Client example:
curl -I https://app.example.com \
  -H 'CF-Access-Client-Id: <client-id>' \
  -H 'CF-Access-Client-Secret: <client-secret>'
Do not put service token secrets in Git. Store them in your secret manager, CI secret store, or root-owned environment file.
5. Optional: validate Access JWTs in the app
For many homelab services, Cloudflare’s edge check is enough as an outer gate. If you own the application code, you can add defense-in-depth by validating the Access JWT yourself.
Cloudflare publishes the signing keys at:
https://<team-name>.cloudflareaccess.com/cdn-cgi/access/certsYour app should verify:
- JWT signature.
audmatches the Access application audience tag.exphas not passed.- User email or group claim matches what your app expects.
This is optional for off-the-shelf apps such as dashboards, but useful for custom internal apps.
Verification
1. Confirm the Access redirect from a clean client
Use a client without a valid Access cookie:
curl -I https://app.example.comExpected result after Access is enabled:
302,303, or another redirect-style response to Cloudflare Access login; or401/403depending on policy and request type.
The exact status can vary by policy and request headers. The key point is that curl without cookies or service token headers should not receive the protected application page.
2. Test in a private browser window
Open a private/incognito window:
https://app.example.comExpected result:
- Cloudflare Access login page appears.
- You authenticate with the allowed email or IdP.
- You land on the application.
- Refreshing the page keeps working until the Access session expires.
3. Test an unauthorized account
Use a different browser profile or private window and log in with an email that is not allowed by the policy.
Expected result:
- Cloudflare denies access.
- The origin app is not shown.
4. Confirm the app is not exposed on the host
On the server, check whether the app publishes a host port:
docker compose psIf the app appears as 0.0.0.0:8080->8080/tcp or [::]:8080->8080/tcp, it is still reachable directly on the host network. Remove the ports: mapping unless you intentionally need LAN access.
From another LAN machine, this should fail if the service is tunnel-only:
curl -I http://server-lan-ip:80805. Test service token access
If you created a service token, test it with headers:
curl -I https://app.example.com \
  -H 'CF-Access-Client-Id: <client-id>' \
  -H 'CF-Access-Client-Secret: <client-secret>'
Expected result:
- The request reaches the app without an interactive login redirect.
- No token values appear in shell history on shared systems. Prefer reading from environment variables for real use.
Troubleshooting
| Symptom | Likely cause | Fix |
|---|---|---|
| Browser still reaches the app without login | Existing Access cookie or policy not attached to hostname | Test in private mode, clear cookies, and confirm the Access app domain exactly matches the hostname. |
| curl receives the app page | Access app is not active for that hostname | Re-check the Access application domain and DNS route. Wait briefly for propagation. |
| Cloudflare Access says application not found | Hostname mismatch | Compare the Access application hostname with the tunnel ingress hostname. |
| Tunnel returns 502 | Origin service name or port is wrong | Confirm the Docker service name and port match service: http://app:8080. |
| Login succeeds but app breaks after redirect | App expects a different hostname or scheme | Check app base URL, trusted proxy settings, and allowed redirect URLs. |
| Monitoring breaks after Access is enabled | Monitoring client lacks service token headers | Create an Access service token and add a Service Auth policy. |
| Users from the right domain are denied | Policy uses exact email instead of domain rule, or IdP claims differ | Inspect Zero Trust Access logs for the evaluated identity and rule result. |
| Google/Microsoft login loops | IdP callback URI or app registration is wrong | Re-check the IdP setup in Zero Trust and the IdP console. |
| Cookies fail in some browsers | Cookie restrictions, browser privacy mode, or conflicting domains | Test with another browser, clear site data, and verify only one Access app covers the hostname. |
| LAN users can bypass Access | App is still bound to host or LAN interface | Remove host ports: mappings or bind only to localhost/private Docker network. |
Security Notes
Risk level: low for adding an authentication gate to an already working tunnel. Risk becomes medium or high if the protected service is an admin interface, stores sensitive data, or has no application-level authentication.
Hardening checklist:
- Keep the service behind the tunnel with no public host port mapping.
- Keep application-level login enabled when the app supports it.
- Use short Access sessions for admin tools.
- Prefer named users or groups over broad domain-wide policies.
- Use service tokens for automation instead of sharing a human session cookie.
- Store service token values outside Git.
- Review Zero Trust Access logs after enabling the policy.
- Keep a rollback path documented before changing production access.
What Access does not solve:
- A malicious but authorized user can still reach the app.
- A stolen valid session cookie may work until it expires.
- A direct LAN path can bypass Access if the app is still exposed internally.
- Access does not replace app backups, patching, least privilege, or audit logs.
Rollback through the dashboard:
Zero Trust -> Access -> Applications -> select app -> Disable or DeleteRollback through the API if you already know the account ID and Access application ID:
curl -s -X DELETE \
  "https://api.cloudflare.com/client/v4/accounts/<account-id>/access/apps/<access-app-id>" \
  -H "Authorization: Bearer <cloudflare-api-token>" \
  -H "Content-Type: application/json"
After rollback, re-test the base tunnel:
curl -I https://app.example.comPerformance Notes
No benchmark was run for this article.
Expected behavior:
- First browser access includes an authentication redirect, so it will feel slower than an already-authenticated request.
- After login, the browser uses the Access session cookie until it expires.
- Service tokens avoid the browser redirect for automation.
- The tunnel path itself is unchanged; Access adds a policy decision before Cloudflare forwards the request.
If you want real numbers for your environment, measure them instead of guessing:
curl -o /dev/null -s -w 'code=%{http_code} total=%{time_total}\n' https://app.example.comFor authenticated browser sessions, use browser developer tools or a controlled test client with valid Access credentials. Do not publish latency claims unless you actually collected the data.
Lessons Learned
The most useful part of this setup is not the login page itself. It is moving the trust boundary away from the application and closer to the edge.
My practical takeaways:
- Start with Email OTP if you only need a quick private gate.
- Move to a real IdP when you need group membership, offboarding, and audit consistency.
- Avoid exposing the app on the host after the tunnel is working.
- Keep Access and app-level auth enabled for anything sensitive.
- Always test with a clean browser profile because existing cookies can hide policy mistakes.
Future Improvements
- Add mTLS for high-risk admin applications.
- Export Access logs to a central logging backend.
- Add WAF rules for noisy paths and obvious bots.
- Build a reusable checklist for new homelab hostnames.
- Create separate policies for humans, monitoring, and automation.
- Document emergency access if Cloudflare or the IdP is unavailable.