Linux · medium risk
Installing WordPress on Ubuntu with LAMP Stack for a Homelab
A complete guide to installing WordPress on Ubuntu Server using Apache, MySQL, and PHP (LAMP) for a homelab environment behind Cloudflare Tunnel.
Installing WordPress on Ubuntu with LAMP Stack for a Homelab
Overview
WordPress powers a significant portion of the web, and running your own instance on homelab hardware gives you full control over performance, storage, and security. This guide covers a manual LAMP stack installation on Ubuntu 24.04 LTS — no Docker, no all-in-one panels — so you understand every layer of the stack and can troubleshoot each piece independently.
The stack:
- Ubuntu 24.04 LTS
- Apache 2.4 with mod_rewrite and HTTPS redirect
- MySQL (or MariaDB) as the database backend
- PHP 8.3 with common WordPress extensions
- WordPress 6.x with wp-config.php hardening
- Cloudflare Tunnel for secure external access
- Let’s Encrypt via Certbot for TLS on the LAN side
Why I Built/Tested This
I have run WordPress inside Docker Compose before. It works, but the manual LAMP approach gives better insight when something breaks. If MySQL runs out of memory, if PHP-FPM times out, or if Apache mod_rewrite rules misbehave, knowing the raw stack makes debugging faster.
For a homelab this is also the cheaper path: a single Ubuntu VM uses fewer resources than a multi-container stack, and the maintenance overhead is lower if you already manage Ubuntu servers.
Hardware/Software Used
- Ubuntu 24.04 LTS (bare metal or VM, 2 GB RAM minimum, 4 GB recommended)
- Apache 2.4.58+
- MySQL 8.0 or MariaDB 10.11
- PHP 8.3 FPM
- WordPress 6.x
- Certbot for TLS
- cloudflared for Cloudflare Tunnel
- ufw for firewall
Architecture
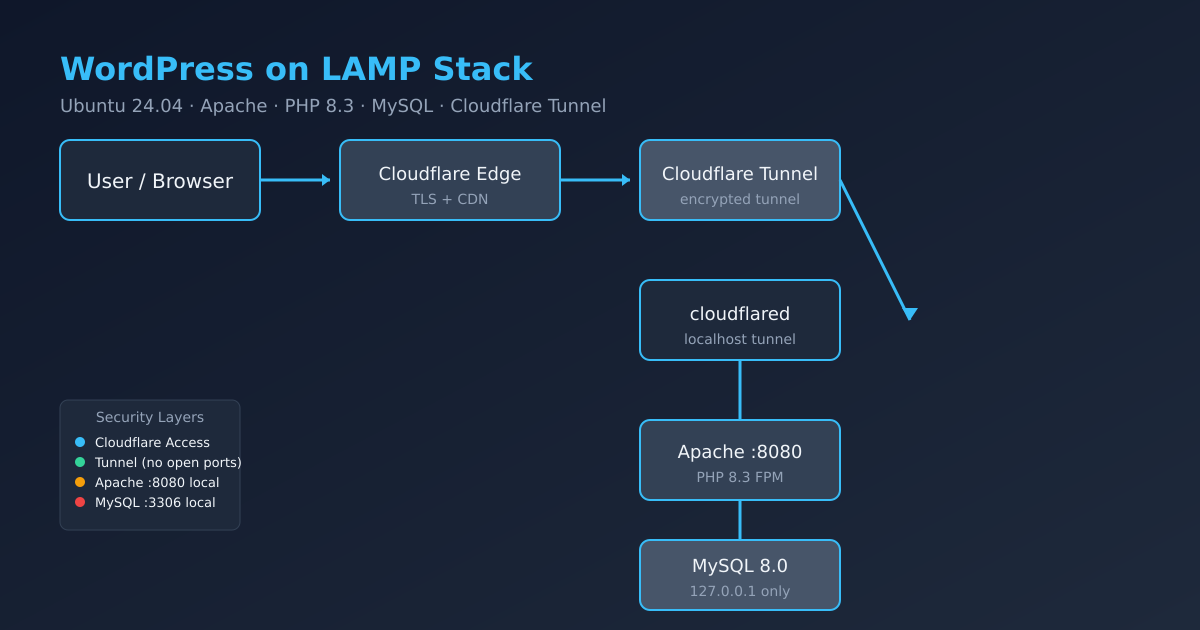
The request flow:
Internet → Cloudflare CDN → Cloudflare Tunnel → cloudflared on the Ubuntu server → Apache (port 443) → PHP-FPM → MySQL
Inside the homelab:
- Apache listens on 127.0.0.1:8080 (not exposed to LAN)
- cloudflared connects to Apache via the local tunnel
- MySQL is also bound to 127.0.0.1 and not exposed externally
- WordPress files reside under /var/www/wordpress
This gives two layers of protection: Cloudflare Access policies on the tunnel side, and no direct network exposure on the LAN side.
Installation
Step 1 — System Update and Prerequisites
sudo apt update && sudo apt upgrade -y
sudo apt install -y apache2 mysql-server php8.3 php8.3-fpm \
  php8.3-mysql php8.3-curl php8.3-gd php8.3-mbstring \
  php8.3-xml php8.3-xmlrpc php8.3-soap php8.3-intl \
  php8.3-zip php8.3-bcmath php8.3-imagick \
  libapache2-mod-fcgid curl wget unzip certbot python3-certbot-apache
Enable the required Apache modules:
sudo a2enmod proxy_fcgi setenvif rewrite ssl headers
sudo a2enconf php8.3-fpm
sudo systemctl restart apache2
Step 2 — Database Setup
sudo mysqlCREATE DATABASE wordpress DEFAULT CHARACTER SET utf8mb4 COLLATE utf8mb4_unicode_ci;
CREATE USER 'wpuser'@'localhost' IDENTIFIED BY 'generate-a-strong-password-here';
GRANT ALL PRIVILEGES ON wordpress.* TO 'wpuser'@'localhost';
FLUSH PRIVILEGES;
EXIT;Step 3 — Download and Configure WordPress
cd /tmp
wget https://wordpress.org/latest.tar.gz
tar -xzf latest.tar.gz
sudo mv wordpress /var/www/wordpress
sudo chown -R www-data:www-data /var/www/wordpress
sudo find /var/www/wordpress -type d -exec chmod 755 {} \;
sudo find /var/www/wordpress -type f -exec chmod 644 {} \;
Step 4 — Configure Apache Virtual Host
Create the Apache site config:
<VirtualHost *:8080>
    ServerName blog.example.com
    DocumentRoot /var/www/wordpress

    <Directory /var/www/wordpress>
        AllowOverride All
        Require all granted
    </Directory>

    <FilesMatch \.php$>
        SetHandler "proxy:unix:/run/php/php8.3-fpm.sock|fcgi://localhost"
    </FilesMatch>

    ErrorLog ${APACHE_LOG_DIR}/wordpress-error.log
    CustomLog ${APACHE_LOG_DIR}/wordpress-access.log combined
</VirtualHost>
Place it in /etc/apache2/sites-available/wordpress.conf, then:
sudo a2ensite wordpress
sudo a2dissite 000-default
sudo systemctl reload apache2
Step 5 — Configure Apache Port and Firewall
Apache should not be on port 80 for this setup. Only the tunnel service needs access:
sudo sed -i 's/^Listen 80$/Listen 8080/' /etc/apache2/ports.conf
sudo ufw allow from 127.0.0.1 to any port 8080 proto tcp
sudo systemctl restart apache2
Step 6 — WordPress Configuration via CLI
cd /var/www/wordpress
sudo -u www-data cp wp-config-sample.php wp-config.php
Generate the authentication salts:
curl -s https://api.wordpress.org/secret-key/1.1/salt/Then edit wp-config.php:
sudo -u www-data nano /var/www/wordpress/wp-config.phpAdd or modify these entries:
define('DB_NAME', 'wordpress');
define('DB_USER', 'wpuser');
define('DB_PASSWORD', 'your-generated-password');
define('DB_HOST', 'localhost');
define('DB_CHARSET', 'utf8mb4');
define('DB_COLLATE', '');

define('WP_HOME', 'https://blog.example.com');
define('WP_SITEURL', 'https://blog.example.com');

define('DISALLOW_FILE_EDIT', true);
define('WP_AUTO_UPDATE_CORE', true);
define('FORCE_SSL_ADMIN', true);
define('WP_POST_REVISIONS', 5);

$table_prefix = 'wp_';

if (!defined('ABSPATH')) {
    define('ABSPATH', __DIR__ . '/');
}
require_once ABSPATH . 'wp-settings.php';
Step 7 — Install WordPress via CLI (WP-CLI)
curl -O https://raw.githubusercontent.com/wp-cli/builds/gh-pages/phar/wp-cli.phar
chmod +x wp-cli.phar
sudo mv wp-cli.phar /usr/local/bin/wp
Run the install:
sudo -u www-data wp core install \
  --url=https://blog.example.com \
  --title="My Homelab Blog" \
  --admin_user=admin \
  --admin_password="generate-a-strong-admin-password" \
  --admin_email=you@example.com
Step 8 — Set Up Cloudflare Tunnel
If you do not already have cloudflared installed:
sudo apt install -y cloudflaredAuthenticate and create the tunnel:
cloudflared tunnel login
cloudflared tunnel create wordpress-tunnel
Create the tunnel config file at ~/.cloudflared/config.yml:
tunnel: wordpress-tunnel
credentials-file: /home/gntech/.cloudflared/wordpress-tunnel.json

ingress:
  - hostname: blog.example.com
    service: http://127.0.0.1:8080
  - service: http_status:404
Then run the tunnel:
sudo cloudflared tunnel run wordpress-tunnel &For a permanent service:
sudo cloudflared service install
sudo systemctl enable cloudflared
sudo systemctl start cloudflared
Add the DNS record in Cloudflare dashboard:
Type: CNAME Name: blog (or your subdomain) Target: wordpress-tunnel.cfargotunnel.com Proxy: enabled (orange cloud)
Step 9 — Optional: Let’s Encrypt for LAN Access
If you want HTTPS when accessing the server from inside your LAN:
sudo certbot --apache -d blog.example.comThis modifies the Apache virtual host to add TLS. Make sure port 443 is NOT exposed to the internet — it is only for local access. The tunnel already handles TLS from Cloudflare to the visitor.
Full Configuration
The final layout after setup:
/var/www/wordpress/          — WordPress core files
/etc/apache2/sites-available/wordpress.conf  — Virtual host
/etc/apache2/ports.conf     — Apache ports (8080 only)
~/cloudflared/config.yml   — Tunnel ingress rules
/etc/mysql/mysql.conf.d/mysqld.cnf  — MySQL bind-address = 127.0.0.1
Verification
Check each layer:
# Apache
curl -s -o /dev/null -w "%{http_code}" http://127.0.0.1:8080
# Expected: 302 (redirect to wp-admin) or 200

# PHP
echo "<?php phpinfo();" | sudo tee /var/www/wordpress/info.php
curl -s http://127.0.0.1:8080/info.php | head -5
sudo rm /var/www/wordpress/info.php

# MySQL
sudo mysql -e "SHOW DATABASES;" | grep wordpress

# Tunnel
curl -s -o /dev/null -w "%{http_code}" https://blog.example.com
# Expected: 200 or 302

# WordPress CLI
sudo -u www-data wp core verify-checksums
Troubleshooting
White screen of death: Check PHP-FPM status:
sudo systemctl status php8.3-fpm
sudo tail -f /var/log/apache2/wordpress-error.log
Database connection error: Verify MySQL is running and the credentials in wp-config.php match what was created:
sudo systemctl status mysql
sudo mysql -u wpuser -p wordpress -e "SELECT 1;"
Permalink 404: Apache mod_rewrite must be enabled:
sudo a2enmod rewrite
sudo systemctl reload apache2
Tunnel not connecting: Check cloudflared logs:
sudo journalctl -u cloudflared --no-pager -n 50Security Notes
- MySQL bind-address is set to 127.0.0.1. The database is never exposed to the network.
- Apache listens on 127.0.0.1:8080 only. No direct external HTTP access.
- Cloudflare Tunnel is the only ingress path from the internet.
- Cloudflare Access can be added on top: users must authenticate via Google/GitHub/email before reaching WordPress.
- DISALLOW_FILE_EDIT in wp-config.php prevents plugin/theme file editing from the dashboard.
- PHP-FPM runs as www-data. WordPress files are owned by www-data.
- Use strong generated passwords for the MySQL user and the WordPress admin account.
- Keep core, plugins, and themes updated. Enable auto-updates for core.
Performance Notes
- PHP 8.3 with FPM is significantly faster than mod_php for concurrent requests.
- A single Ubuntu VM with 2 GB RAM and 2 vCPUs can handle dozens of concurrent visitors if a caching plugin (WP Super Cache, W3 Total Cache) is enabled.
- Consider adding Redis object cache for database query caching.
- MySQL performance: tune /etc/mysql/mysql.conf.d/mysqld.cnf for your available RAM. A conservative starting point for 2 GB:
innodb_buffer_pool_size = 512M
innodb_log_file_size = 64M
max_connections = 50
key_buffer_size = 32M
Lessons Learned
- Running Apache on port 8080 and exposing only through Cloudflare Tunnel is cleaner than maintaining a reverse proxy on the same host.
- WP-CLI makes the initial install scriptable and reproducible. Do not use the browser-based setup for homelab automation.
- The authentication salts must be unique per install. The curl command in this guide generates fresh ones.
- Setting WP_HOME and WP_SITEURL before the initial visit prevents URL mismatch issues later.
Future Improvements
- Add Redis object cache via the Redis Object Cache plugin.
- Add Cloudflare Access policy in front of /wp-admin for an extra login step.
- Use Cloudflare Turnstile instead of the default WordPress captcha.
- Offload media uploads to a separate S3-compatible storage endpoint (MinIO in the homelab works well).
- Set up automated mysqldump backups to NAS.
- Replace Apache with Nginx + PHP-FPM for better performance under load.